Spring常见错误 |
您所在的位置:网站首页 › 引用jar包的service 注入为空 › Spring常见错误 |
Spring常见错误
|
Spring常见错误 - Bean构造注入报空指针异常
前言一. 构造器内报NPE1.1 案例1.2 原理分析1.2.1 空指针发生在哪一个阶段?1.2.2 studentService字段为何是Null?
1.3 解决
二. Bean加载的初始化阶段2.1 applyBeanPostProcessorsBeforeInitialization2.2 invokeInitMethods2.3 总结
前言
推荐大家先看下Spring源码系列:Bean的加载。那么本文的案例就很容易懂其原理了。 一. 构造器内报NPE我们来看下案例: 1.1 案例我们随便自定义一个类,并希望在创建HelloServiceBean的时候,完成say()操作,打印出Student的字样。那么我们一般首先想到的就是在构造函数中完成对应的逻辑执行。 @Component public class HelloService { @Autowired private StudentService studentService; public HelloService() { studentService.say(); } }项目启动后: 这一切还得从Bean的创建来说起,相关函数在AbstractAutowireCapableBeanFactory.doCreateBean(): protected Object doCreateBean(String beanName, RootBeanDefinition mbd, @Nullable Object[] args) throws BeanCreationException { // Instantiate the bean. BeanWrapper instanceWrapper = null; if (mbd.isSingleton()) { instanceWrapper = this.factoryBeanInstanceCache.remove(beanName); } // 1.实例的创建 if (instanceWrapper == null) { instanceWrapper = createBeanInstance(beanName, mbd, args); } // ... Object exposedObject = bean; try { // 2.属性注入 populateBean(beanName, mbd, instanceWrapper); // 3.Bean的初始化 exposedObject = initializeBean(beanName, exposedObject, mbd); } catch (Throwable ex) { // .. } // .. return exposedObject; }Bean的创建分为三大步骤: 实例构造:createBeanInstance()。依赖注入:populateBean()。初始化:initializeBean()。 1.2.1 空指针发生在哪一个阶段?那么这里我们首先围绕第一个阶段:createBeanInstance()函数来展开: 总结如下: 先看这个Bean是否有对应的回调函数或者工厂方法。有的话直接调用返回。解析这个Bean的构造函数。如果解析过了,那么直接调用。再看这个Bean是否有构造函数注入。若都无,则调用默认的构造函数。而代码Debug中:可以看到,没有解析到相关的构造函数,那么此时就会调用默认的构造。 对于本案例来说,就是简单的调用了我们自己创建的构造函数罢了。如图: 思考过程: 对于HelloService类来说,其属性注入(studentService字段的装配)阶段发生在实例构造阶段之后。而studentService字段通过@Autowired注解来完成自动装配,在属性注入阶段,即在populateBean()函数中实现。但此时populateBean()还没有被执行。因此 studentService在实例构造的时候值为null。因此无法调用其相关函数,会NPE。 1.3 解决总的来说就是使用 @Autowired 直接标记在成员属性上而引发的自动装配操作是在当前类构造器执行之后发生的。 因此我们可以不用@Autowired注解,改为构造函数注入的方式: @Component public class HelloService { private StudentService studentService; public HelloService(StudentService studentService) { this.studentService = studentService; studentService.say(); } }执行结果: 其实,本案例的写法是非常少见的,但是这个思想却比较常见,即:希望某个Bean在创建的时候执行某段逻辑。 只不过1.1案例中,采取的是构造函数来执行某段逻辑的方式。但由于对SpringBean生命周期加载顺序的不了解,导致了空指针异常。其实还有别的方法可以代替这种构造函数的写法。 二. Bean加载的初始化阶段上文提到了,Bean的创建一共有三个步骤,第三个步骤就是最终的收尾工作,初始化阶段,我们来看下函数: exposedObject = initializeBean(beanName, exposedObject, mbd); protected Object initializeBean(String beanName, Object bean, @Nullable RootBeanDefinition mbd) { // ... // 1.执行某种后置处理器 Object wrappedBean = bean; if (mbd == null || !mbd.isSynthetic()) { wrappedBean = applyBeanPostProcessorsBeforeInitialization(wrappedBean, beanName); } try { // 2.执行用户自定义的init方法。 invokeInitMethods(beanName, wrappedBean, mbd); } // ... return wrappedBean; }这段代码有两个比较重要的分支: applyBeanPostProcessorsBeforeInitialization:执行某种后置处理器。invokeInitMethods:执行用户自定义的init方法。 2.1 applyBeanPostProcessorsBeforeInitialization这名字看起来很长。。但是吧,这个名字里面有一个非常突出的名称:BeanPostProcessors。我们知道BeanPostProcessors是一个接口:它的主要功能是在Bean的初始化阶段的前后做一些自定义操作。 我们来追溯下它的执行: public Object applyBeanPostProcessorsBeforeInitialization(Object existingBean, String beanName) throws BeansException { Object result = existingBean; for (BeanPostProcessor processor : getBeanPostProcessors()) { Object current = processor.postProcessBeforeInitialization(result, beanName); if (current == null) { return result; } result = current; } return result; }这里执行的是InitDestroyAnnotationBeanPostProcessor下的具体实现: public class InitDestroyAnnotationBeanPostProcessor implements DestructionAwareBeanPostProcessor, MergedBeanDefinitionPostProcessor, PriorityOrdered, Serializable { @Override public Object postProcessBeforeInitialization(Object bean, String beanName) throws BeansException { // 根据类信息找到相关的元数据信息 LifecycleMetadata metadata = findLifecycleMetadata(bean.getClass()); try { // 执行相关的初始化函数 metadata.invokeInitMethods(bean, beanName); } // .. return bean; } }而findLifecycleMetadata的相关逻辑和buildLifecycleMetadata息息相关。 private LifecycleMetadata findLifecycleMetadata(Class clazz) { if (this.lifecycleMetadataCache == null) { // Happens after deserialization, during destruction... return buildLifecycleMetadata(clazz); } // Quick check on the concurrent map first, with minimal locking. LifecycleMetadata metadata = this.lifecycleMetadataCache.get(clazz); if (metadata == null) { synchronized (this.lifecycleMetadataCache) { metadata = this.lifecycleMetadataCache.get(clazz); if (metadata == null) { metadata = buildLifecycleMetadata(clazz); this.lifecycleMetadataCache.put(clazz, metadata); } return metadata; } } return metadata; }buildLifecycleMetadata: private LifecycleMetadata buildLifecycleMetadata(final Class clazz) { if (!AnnotationUtils.isCandidateClass(clazz, Arrays.asList(this.initAnnotationType, this.destroyAnnotationType))) { return this.emptyLifecycleMetadata; } List initMethods = new ArrayList(); List destroyMethods = new ArrayList(); Class targetClass = clazz; do { final List currInitMethods = new ArrayList(); final List currDestroyMethods = new ArrayList(); ReflectionUtils.doWithLocalMethods(targetClass, method -> { if (this.initAnnotationType != null && method.isAnnotationPresent(this.initAnnotationType)) { LifecycleElement element = new LifecycleElement(method); currInitMethods.add(element); if (logger.isTraceEnabled()) { logger.trace("Found init method on class [" + clazz.getName() + "]: " + method); } } if (this.destroyAnnotationType != null && method.isAnnotationPresent(this.destroyAnnotationType)) { currDestroyMethods.add(new LifecycleElement(method)); if (logger.isTraceEnabled()) { logger.trace("Found destroy method on class [" + clazz.getName() + "]: " + method); } } }); initMethods.addAll(0, currInitMethods); destroyMethods.addAll(currDestroyMethods); targetClass = targetClass.getSuperclass(); } // ... }我们可以看出,buildLifecycleMetadata()函数主要是寻找两类函数,找到了就将他们加入到结果集并返回。 initAnnotationType:初始化方法,相关类型如下: destroyAnnotationType:销毁方法,相关类型如下: 每个Bean在初始化阶段,可能都会去执行applyBeanPostProcessorsBeforeInitialization函数,即后置处理器。 applyBeanPostProcessorsBeforeInitialization函数主要去寻找这个类中寻找两类方法。 @PostConstruct注解修饰的initMethods方法、@PreDestroy注解修饰的destroyMethods方法。 去执行对应的initMethods方法,完成后置处理。 那么对于本篇文章而言,我们可以通过 @PostConstruct注解来替代隐式构造函数注入: @Component public class HelloService { @Autowired private StudentService studentService; @PostConstruct public void init() { studentService.say(); } @PreDestroy public void destroy() { System.out.println("Bye Bte"); }程序跑起来然后关闭: invokeInitMethods的执行,总的来说就是判断当前Bean是否实现了InitializingBean接口,若实现了,则执行对应的afterPropertiesSet()。 protected void invokeInitMethods(String beanName, Object bean, @Nullable RootBeanDefinition mbd) throws Throwable { boolean isInitializingBean = (bean instanceof InitializingBean); if (isInitializingBean && (mbd == null || !mbd.isExternallyManagedInitMethod("afterPropertiesSet"))) { // ... if (System.getSecurityManager() != null) { // ... } else { ((InitializingBean) bean).afterPropertiesSet(); } } // ... }那么我们就可以通过这样的方式来完成同样的效果: @Component public class HelloService implements InitializingBean { @Autowired private StudentService studentService; @Override public void afterPropertiesSet() throws Exception { studentService.say(); } }结果如下: 总结下本篇文章哈: 如果某个Bean中的某个字段A,通过@Autowired注解进行自动装配。同时在该Bean中还显式声明了构造函数,并调用这个A对象的某个方法。那么这种情况会出现NPE。终极原因是因为,Spring中一个Bean的创建,其属性注入阶段(字段A的赋值)在实例构造阶段(Bean的构造函数调用)之后。要想避免这种错误。可以通过构造注入的方式来完成。也可以通过@PostConstruct注解修饰对应的初始化逻辑。或者是实现InitializingBean接口,在afterPropertiesSet()函数中完成对应逻辑。 |
 可以见到抛了空指针异常。从代码上看,看来是注入的studentService出了问题,此刻还是null。那么为什么会这样呢?这就要看Bean加载的一个生命周期了。
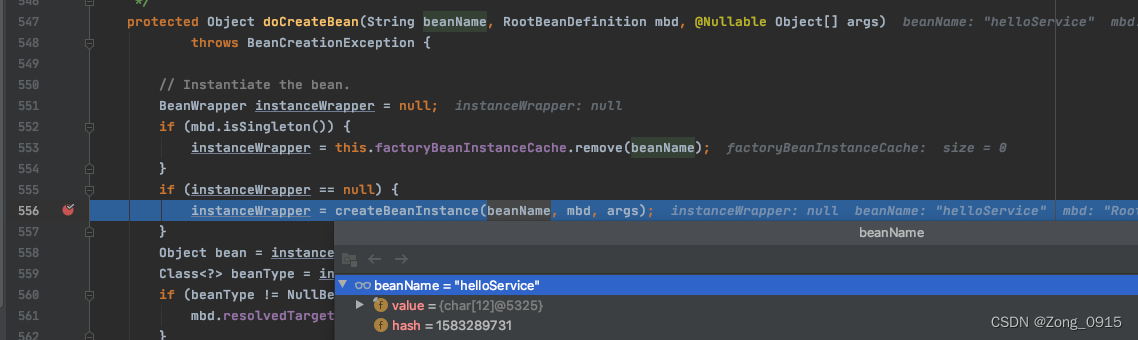 来看下它的源码:
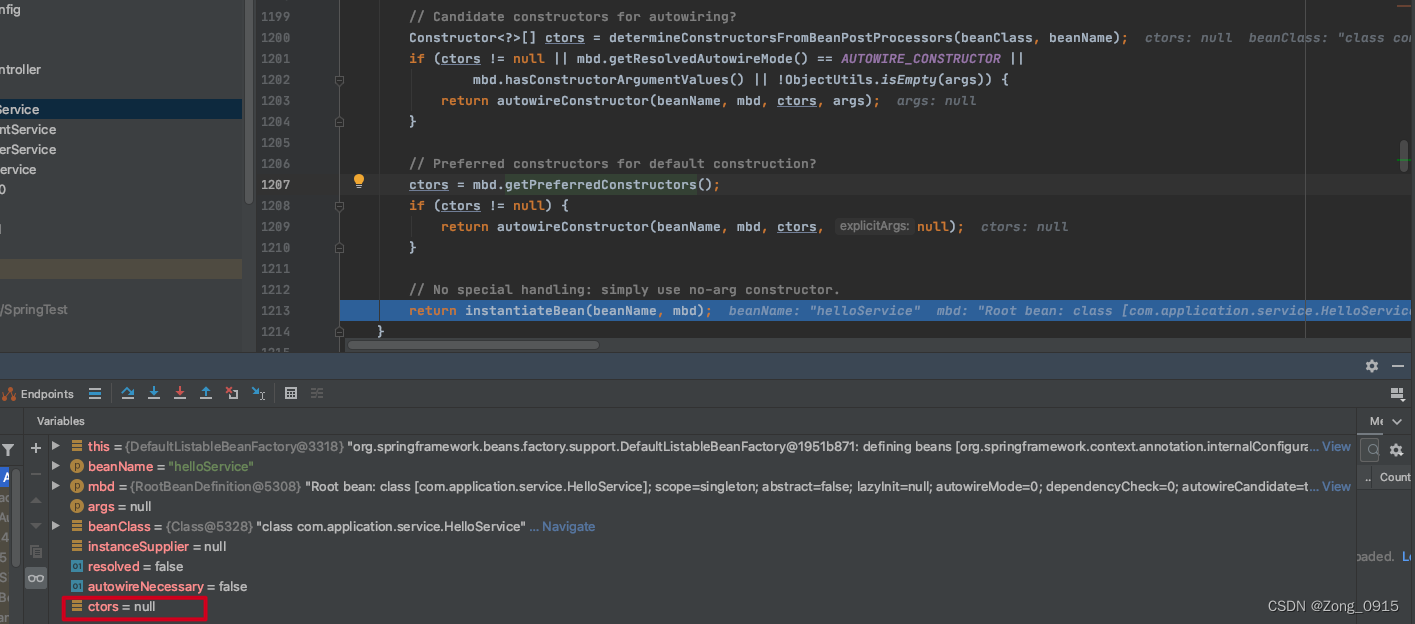 而底层逻辑就是根据两种情况执行两种不同的实例创建策略:
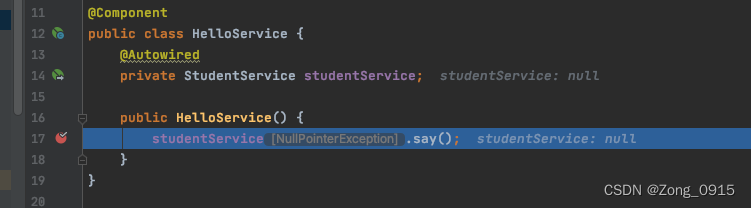 在这里,我们知道空指针异常发生在HelloService的实例构造阶段。

 取到了之后,则交给外层的逻辑metadata.invokeInitMethods(bean, beanName);去调用即可。总结下就是:
 可见同样能达到创建Bean的阶段中,执行某段逻辑的效果。那么我们再来看下第二种方案。
【本文地址】
今日新闻 |
推荐新闻 |